How to Configure a Full Wrap Design When Engraving Tumblers
How to Configure a Full Wrap Design When Engraving Tumblers
Overview
What you will learn
In this guide, you will learn the basics of how to configure a file for a full wrap design when engraving a tumbler or similar cylindrical object.
When to do this
This guide can be referenced any time that you are trying to engrave a design that wraps the entire circumference of a cylindrical object.
What You Need
- Rotary Device
- Chuck Style Rotary (Recommended)
- Roller Style Rotary
- Item to Engrave
- Measuring Device
- Calipers (Recommended)
- Soft Tape Measure
- LightBurn Software
- A Design to Engrave
Need assistance?
Book time with a qualified technician and get help with Full Wrap Rotary Engraves.
Preface
This guide has been written under the assumption that your machine is already in the proper configuration to perform rotary jobs. If you need help setting up a rotary, see our guide for how to setup your rotary and configuration information. If you need help with figuring out what settings to use when engraving with a rotary, see our guide on optimizing tumbler settings as well.
>Our AEON Laser USA brand ambassador, Emily Caroline (That Mom with a Laser), has a wonderful video on performing a full wrap design on a tapered tumbler for reference.
What is a Full Wrap?
A full wrap refers to a design or decoration that completely encircles the outer surface of a cylindrical or curved object, such as a tumbler, bottle, or mug. The term highlights that the design covers the entire circumference of the item, creating a 360 degree effect.
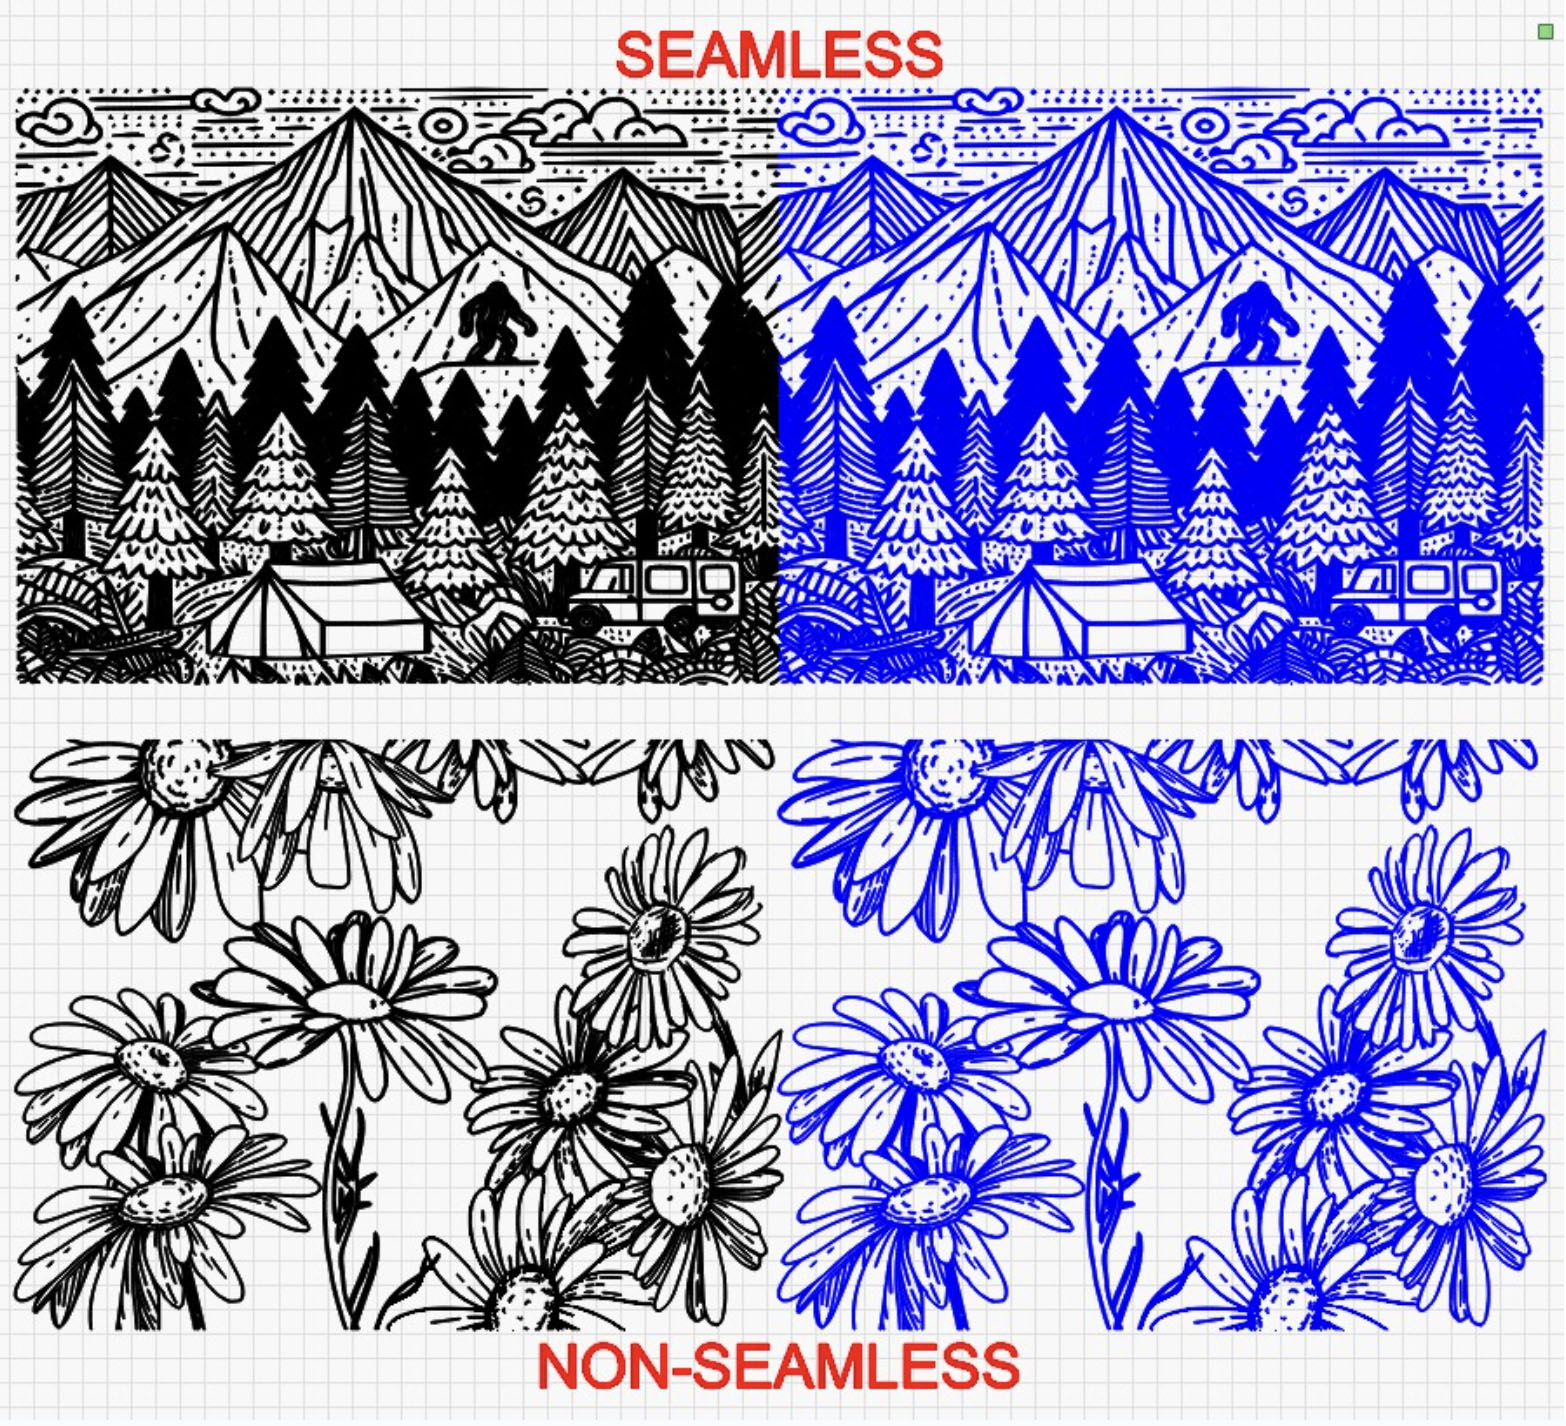
There are two types of full wrap designs: a seamless wrap and a non-seamless wrap.
A seamless wrap is a design where the edges meet perfectly without visible gaps or overlaps, creating a continuous and uninterrupted pattern around the object.
A non-seamless wrap is a design where the edges meet with a visible seam, gap, or overlap, marking the start and end of the pattern.
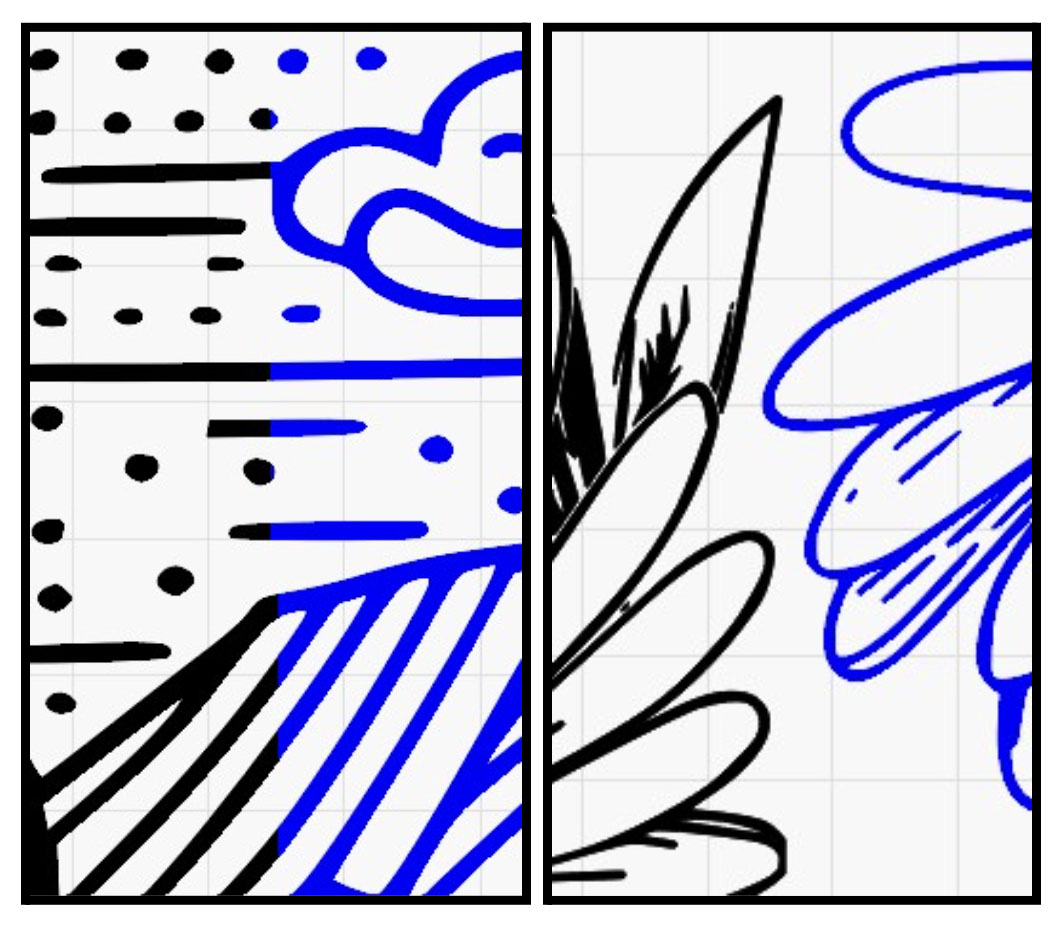
The images below illustrate the difference between seamless and non-seamless designs. In the seamless design close-up, the edges align perfectly, creating a flawless flow. With the non-seamless design, while the pattern overlaps during engraving, the edges do not touch, resulting in a visible break in the design.
What Rotary is Best for a Full Wrap?
The best rotary for a full wrap engraving depends on the type of object you're working with, but in general, chuck rotaries are preferred for their advanced precision and control. Chuck rotaries securely hold the item in place, allowing for consistent rotation and precise alignment. This is critical for seamless wraps where precise alignment of edges is required.
While roller rotaries can handle cylindrical objects, they are less ideal for full wraps due to potential slipping or misalignment during rotation. Slippage can occur, especially with heavier or tapered items, which compromises precision for full wraps, particularly seamless designs. So while a roller rotary can perform a full wrap design, it is not an ideal tool for the job. Chuck rotaries are recommended for performing full wrap designs.
Getting Measurements
The first step for any full wrap is to get some measurements. Accurate measurements are essential for a successful full wrap engraving. These measurements determine the design’s size and may also be required when configuring rotary settings, especially if using a chuck rotary.
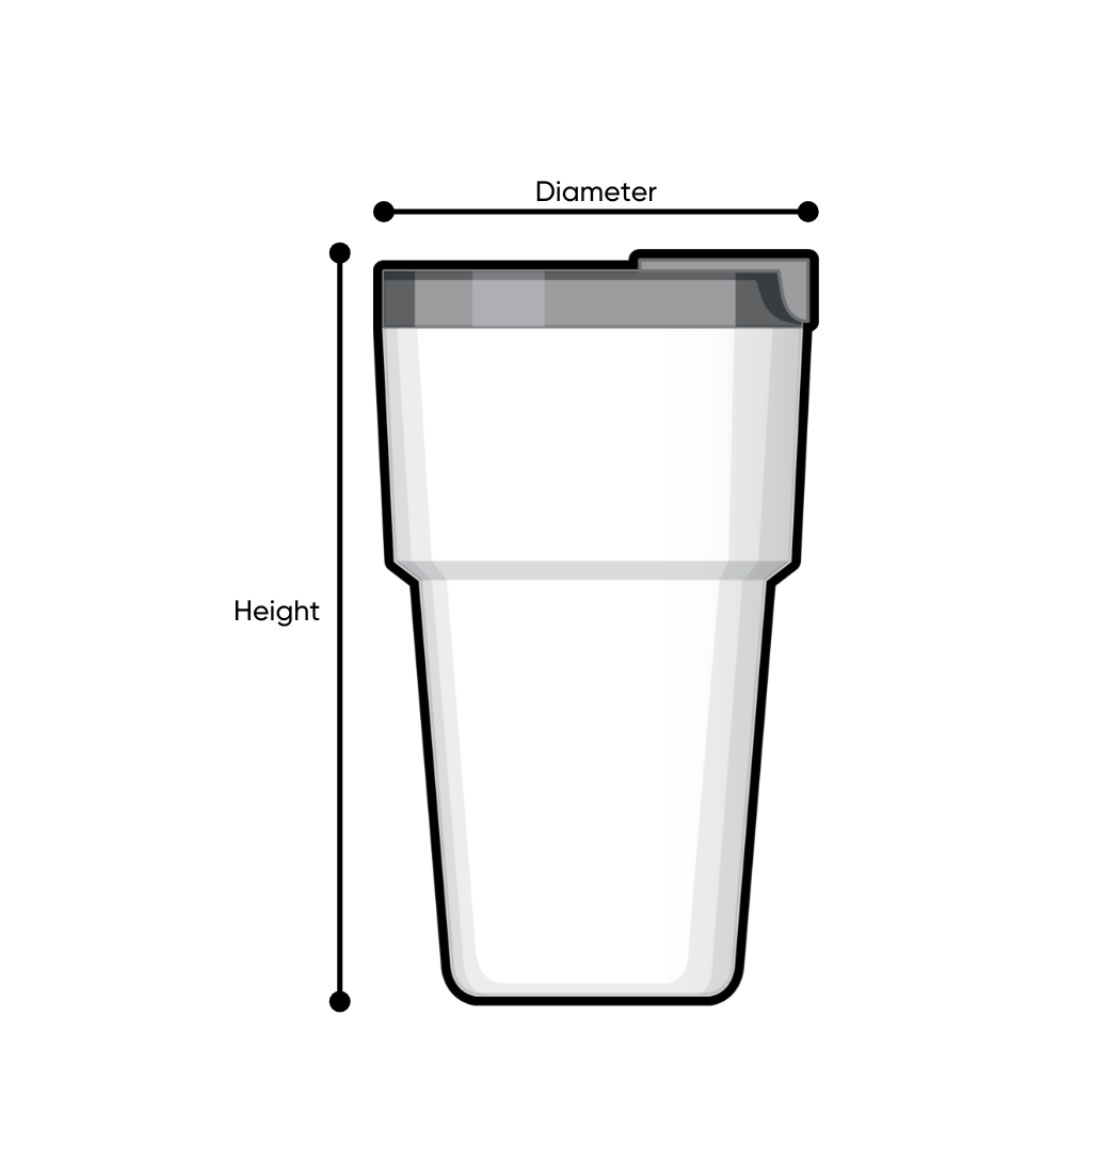
You’ll need two key measurements: the diameter (or circumference) of the item and the height of the engravable area. Record these measurements carefully, as they will be used in the software setup during the next step. It is recommended that calipers are used when getting the necessary measurements, though a cloth ruler will do the trick as well.
NOTE: If you are trying to engrave an item with a taper, which would have two different circumstances, the larger diameter/circumference will be the value used in the process. LightBurn has an integrated tool for adjusting for a taper warp on the design. See LightBurn’s documentation on the taper warp tool.
Inputing the Measurements
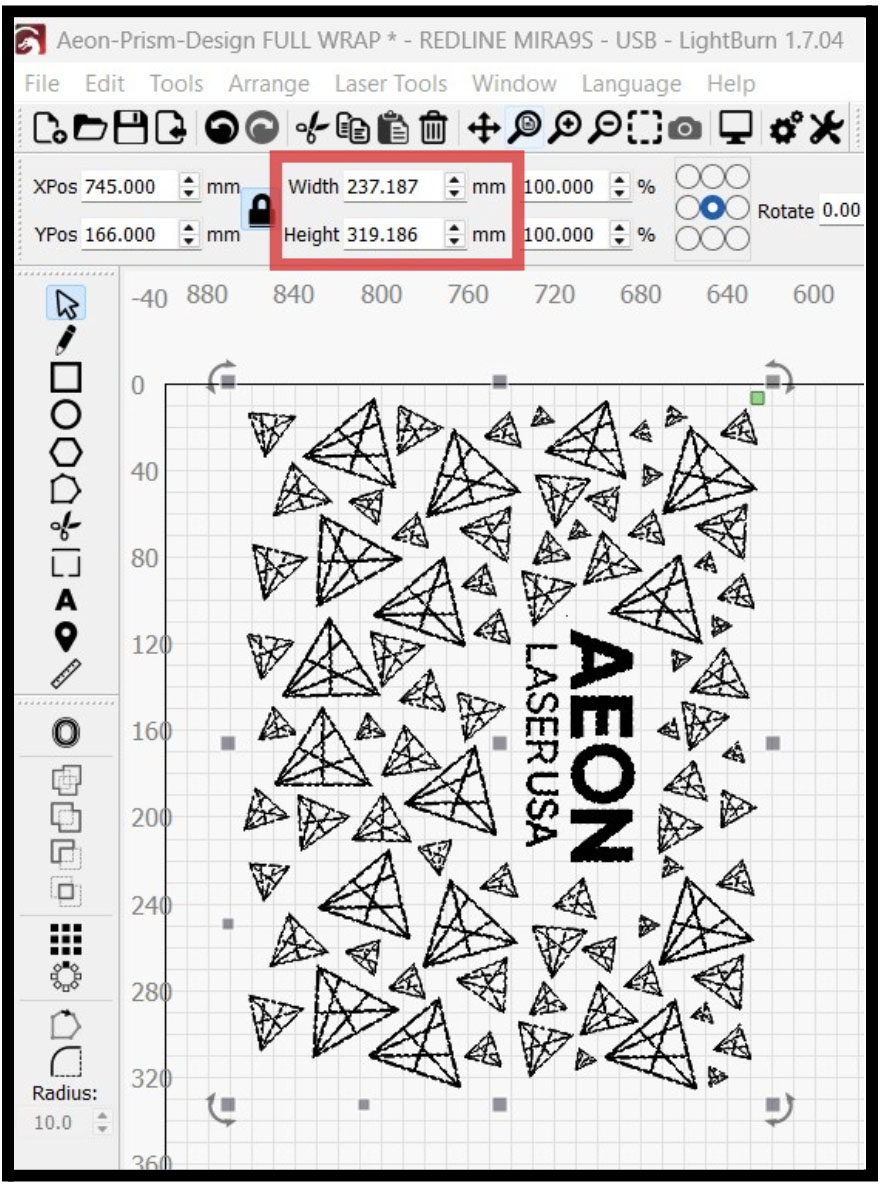
Once the measurements have been taken, move to LightBurn. The measured height will correlate to the total width of the file. This may seem counterintuitive, but keep in mind that the “height” of the cup will be along the X axis of the machine while it engraves, and the file should be rotated before sending to the machine to engrave to reflect this. For example, if the engravable area on the item is 237.187 mm, the file should be rotated like any rotary job and the width of the file should be set to match that value.
The measured diameter (or circumference) is entered into the rotary tool section of LightBurn, as shown below. This value determines how much the chuck rotary spins and is crucial for achieving a full wrap. Accuracy is particularly important for seamless wraps, as the file’s edges must align perfectly to create a continuous design. For non-seamless designs, there is more flexibility since the file’s ends don’t require precise alignment.
CAUTION: An inaccurate diameter measurement will cause the item to rotate too little or too much on the chuck rotary, leading to errors while engraving.
- If the diameter (or circumference) measurement is too low: The rotary will rotate the object too far, resulting in overlapping or stretched designs.
- If the measurement is too high: The rotary will rotate the object too little, causing gaps or compressed designs.
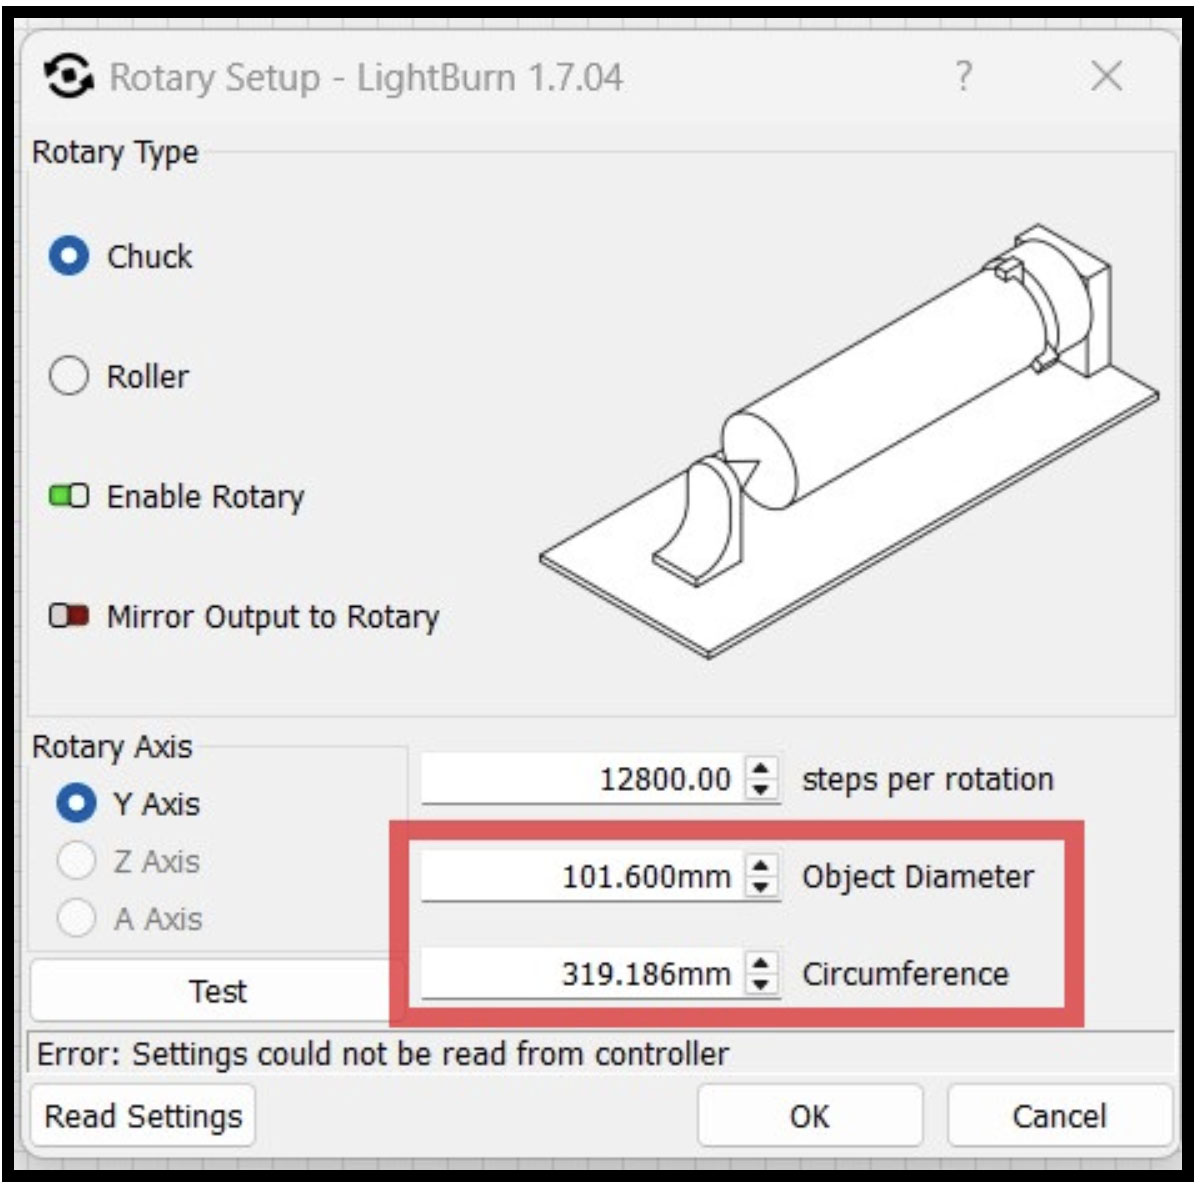
When the diameter is input into LightBurn, the software will automatically calculate a circumference value. This value will correspond to the height of the file, as that value is the total area around the cup, thus resulting in the full wrap. For a non-seamless design, the value input for the design’s height can be 1 to 2 mm short to ensure there is no overlapping when engraving. For example, a cup with a diameter of 101.6 mm has a circumference of 319.186 mm. The height value of the file should be adjusted to match this to achieve the full wrap effect.
After the file has been edited and the rotary settings have been updated, the file is ready to be sent to the machine and run.
Rotary and Item Setup
The remaining considerations for a successful full wrap involve the item setup on the rotary. Here are the key points to address:
- Focus
- For the full wrap job, the entire length of the item must remain within the laser's focal range.
- Non-Tapered Cups: Focus as you normally would, as the surface remains consistent.
- Tapered Cups: Adjust the cup's angle on the rotary to ensure the surface stays within a usable focal range across its length.
- Squareness
- Ensure the cup is square to the gantry. If the rotary or item is misaligned, the design will engrave at an angle, leading to improper alignment, which is especially problematic for seamless wraps.
- Item Clearance
- Verify the item has full clearance throughout the engraving process. This is particularly important for cups with handles or mounting tabs that could obstruct the laser head.
- To increase clearance, consider options such as using a deeper focal length lens or removing hardware from the laser head.
- A common practice for engraving a full wrap on a 40 oz tumbler is to use a 2.5” lens, which lowers the focal point and grants clearance from the laser head.
- Seam Placement
- While not strictly required, it is good practice to position the seam of the design in a less noticeable area on the item if possible. For cups with handles, align the seam along the handle to minimize its visibility and help mask any minor imperfections in the alignment or engraving.
Conclusion
Configuring a full wrap design requires careful preparation, accurate measurements, and proper setup of both the rotary device and the item being engraved. From inputting accurate measurements into LightBurn to ensuring the item is square, focused, and clear of obstructions, attention to detail at each step will lead to a successful engraving. With these techniques, you can achieve professional results and create stunning, fully wrapped designs on cylindrical items with ease.
If you have any questions or concerns, please send us an email at support@aeonlaser.us for the fastest service. If your laser is malfunctioning, please submit a support ticket.
Did you find this document helpful? Let us know what you liked or what we can improve on by sending an email to helpusgrow@aeonlaser.us.
Happy Lasering!
DISCLAIMER: AEON LASER USA AND ENGRAVING MACHINES PLUS, CORP ARE NOT RESPONSIBLE FOR ANY DAMAGES OR INJURIES THAT MAY RESULT FROM FOLLOWING THESE SUGGESTIONS. USE CAUTION AT ALL TIMES.
Related Articles
Materials
Materials 10 Docs Glass Engraving Last Updated: 14th July, 2023 Glass tends to break due to the glass getting too hot, so lowering the LPI to 200-250 is ideal. We recommend defocusing especially when the tube is so powerful.... Engraving Raster ...3D Engraving on Metal with a Fiber Laser
3D Engraving on Metal with a Fiber Laser Updated on Apr 08, 2026 Overview What you will learn In this guide, you will learn how to process an image and the basis behind identifying the settings to use for 3D style engraving into metal with your fiber ...Engraving Raster Images
Engraving Raster Images Updated on Apr 08, 2026 Overview What you will learn In this guide, you will learn how to identify a raster image and important things to consider when trying to engrave a photorealistic image with your laser. When to do this ...Optimizing Air Assist to Improve Engraving Detail and Cutting Efficiency REDLINE
Optimizing Air Assist to Improve Engraving Detail and Cutting Efficiency REDLINE Updated on Feb 27, 2025 Overview In this guide, you will learn about the different air assist options available on your AEON laser engraving machine, how they affect ...Glass Engraving
Glass Engraving Updated on Apr 08, 2026 Glass tends to break due to the glass getting too hot, so lowering the LPI to 200-250 is ideal. We recommend defocusing especially when the tube is so powerful. By lowering the bed about 2mm, it will spread the ...